Toast Your Friends and Family by Making a Personalized Etched Wine Glass for Them - Using a Cricut and Glass Etching Cream
- Oct 29, 2022
- 3 min read
Updated: Feb 9
**This blog post includes Amazon affiliate links and I will earn a commission for qualifying orders through these links.
These are some fun wine glass etching ideas to get your creative energy flowing! These glasses can make holiday gifting, or any festive occasion, super special by making your friends a wine glass etched just for them! You can learn how to make them by following the steps below. I've also included affiliate links to Amazon, and design links to Cricut if you would like to use similar materials and designs that I did. Primary materials are a wine glass, Cricut, vinyl, and glass etching cream.
Have fun creating!!


Steps to Make
1
Select a nice wine glass to etch. Be sure to pick one that has a flatter surface towards the top. If the bulb of the glass is too rounded, you will have a hard time keeping the sticker and stencil edges down. If they pop up, your glass etching cream will get underneath and cause fuzzy edges.
Two examples of good choices:
2
Be sure to thoroughly clean the outside of the glass. If there is any residue from label on the outside, Goo Gone works really well to remove them. Once all residue is gone, rub down the outside of the glass with rubbing alcohol. This will get all dirt and oils off so your stencils stick really well.
3
Design your stencil. I used my Cricut Maker 3 to design and cut out the ones you see in the picture gallery. Links to two patterns I made can be found here:
There are also many pre-made stencil packs available to choose from
4
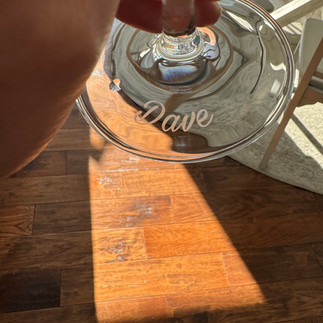
After you have our design, cut your stencil, weed it, and place it on the flattest part of the glass you can find, without getting too high on the glass. I also 'tagged' my glasses with my initials on the base of the glass (you can see where in the photo gallery below). If your custom name is not on the glass, you can put their name on the base.
Make sure that the edges of the stencil have no air bubbles by using a scraper. You can flip the glass over and look from the other side to see you have any bubbles.
If you're new to using a Cricut, there is a good training video on how to do this step here: https://www.youtube.com/watch?v=C2l4QNAa0SY
5
Once you have your stencil on the glass, use a small paint brush to dab glass etching paste onto the open areas inside the stencil. You can pour some of the paste in a separate container first - but I just dipped my brush into the paste container. You can use the paste over and over again, so if you put in another container, put in back in the paste jar after use.
There are several brands of etching cream to choose from. Can get at any craft store or on Amazon. It does seem a little expensive, but it lasts a very long time. I have had the same 10 oz bottle for several years and many projects. The brand I used is Armour Etch.
Link to cream: https://amzn.to/3r4UDWB
With two paint brushes: https://amzn.to/3NTDCYw
Recap of Materials Needed:
Wine glass. Be sure to pick one that has a flatter surface towards the top. If the bulb of the glass is too rounded, you will have a hard time keeping the sticker and stencil edges down. If they pop up, your glass etching cream will get underneath and cause fuzzy edges.
Glass etching cream. Several brands to choose from. Can get at any craft store or on Amazon. It does seem a little expensive, but it lasts a very long time. I have had the same 10 oz bottle for several years and many projects. The brand I used is Armour Etch:
Link to cream: https://amzn.to/3r4UDWB
With two paint brushes: https://amzn.to/3NTDCYw
Stencils. You can buy stencils at a craft store or make your own using a Cricut or other die cutting machine.